> For the complete documentation index, see [llms.txt](https://siff.gitbook.io/siff/llms.txt). Markdown versions of documentation pages are available by appending `.md` to page URLs; this page is available as [Markdown](https://siff.gitbook.io/siff/guides/servicenow-integration.md).
# ServiceNow Integration
### Overview
ServiceNow customers can integrate with SIFF in a number of ways:
1. Configuring ServiceNow as a source for Change Requests in the SIFF Change App:
* Synchronize change requests with SIFF and propagate changes back to ServiceNow
* Link through from SIFF to ServiceNow
* Importing contacts from ServiceNow (for referencing in Change Requests)
* Enriching ServiceNow Change Request to indicate number of changes, issues, and links back to SIFF (this requires additional configuration in ServiceNow)
2. Discovering elements based on the ServiceNow CMDB for SIFF to manage.
### Configuring Change Source
#### Prerequisites
1. An existing ServiceNow instance and URL to access
2. At least one SIFF Collector as access to the ServiceNow instance is via a Collector.
3. Network access for the Collector to access the ServiceNow instance (if any restrictions / firewalls are in place)
4. ServiceNow user and password for access. This user *must* be configured with the timezone `GMT` to ensure dates/times shown in SIFF match the date/times shown in ServiceNow. The user must also have necessary privileges to access the following tables:
* `change_request`
* `sys_user`
* `sys_journal_field`
* `incident`
* `task_ci`
* `task_cmdb_ci_service`
* `cmdb_ci`
* `sn_si_incident` (if ServiceNow Security Incident Response plugin enabled)
#### SIFF Configuration
Configuration is handled via the Admin app under *Change Sources*:
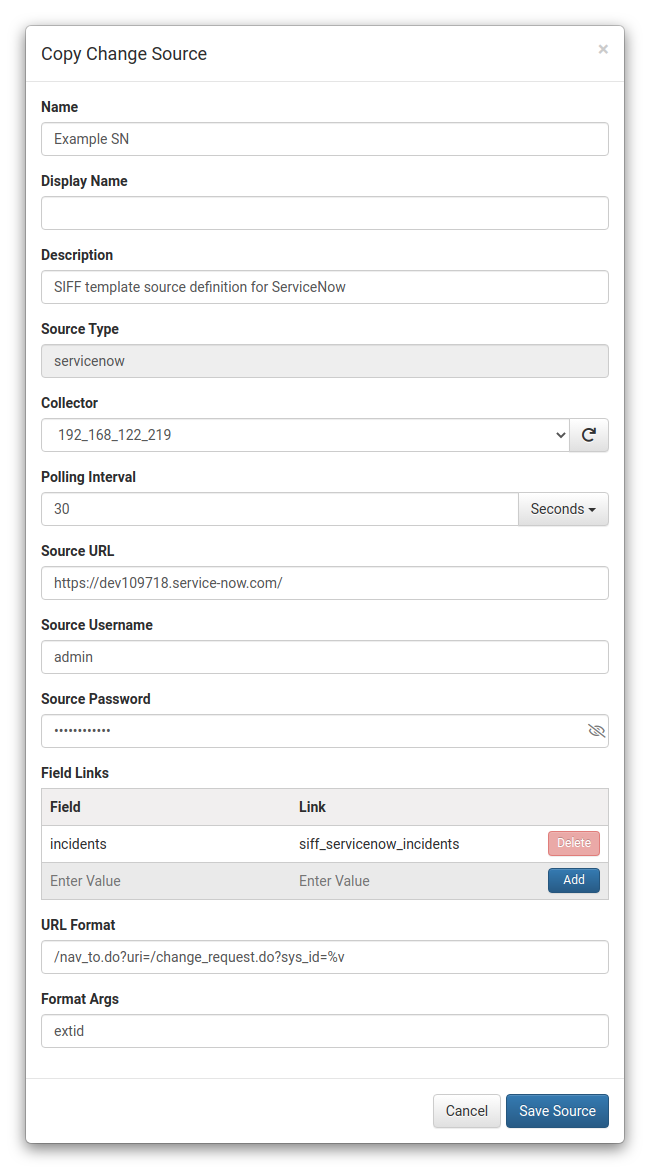
1. Start by selecting the built-in `siff-servicenow` template and the *Copy* button. This will bring up the configuration dialog as shown above.
2. Set an appropriate name
3. Choose a Collector used to communicate with ServiceNow
4. Set the Source URL (URL to the ServiceNow instance)
5. Set the Username and Password to access ServiceNow
6. Other fields can be left as-is
7. Click the *Save Source* button
8. Back on the Source list select the new entry and *Activate*.
If working correctly the *Status* should update to *running*. Otherwise check the *Error Detail* for more information.
**Note:** Only change requests modified/added after activation time will be synchronised with SIFF.
#### Change App
With a ServiceNow Change Source configured and newly added or modified change requests made on the ServiceNow side, these should begin to become visible via the SIFF Change App.
Below is an example change request imported from Service Now:
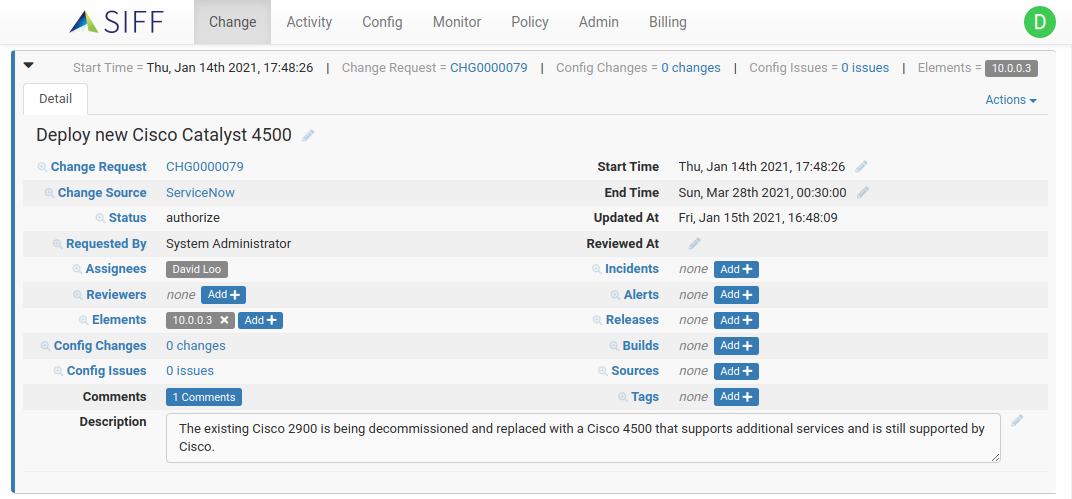
| Field | Notes |
| --------------------- | --------------------------------------------------------------------------------------------------------------------------------------------- |
| (Summary) | synchronised with ServiceNow field *Short description* |
| Change Request | Change Request ID as from ServiceNow. Clicking on the actual ID will link back to the ServiceNow instance to view the entry. |
| Status | synchronised with ServiceNow field *State* |
| Requested By | synchronised with ServiceNow field *Requested By* |
| Assignees | synchronised with ServiceNow field *Assigned to* |
| Elements | resolved by *Affected CIs* on the ServiceNow entry, can also be updated on the SIFF side to indicate which SIFF managed elements are impacted |
| Comments | synchronised with ServiceNow *Notes* |
| Start Time / End Time | synchronised with ServiceNow *Planned* start/end dates, or *Actual* start/end dates if set. Can be updated from SIFF. |
| Description | synchronised with ServiceNow field *Description* |
### Configuring CMDB Element Discovery
#### Prerequisites
*Same as for Configuring Change Source*
#### SIFF Configuration
Configuration for discovery is managed via the Monitor app under *Discovery* -> *CMDB*:
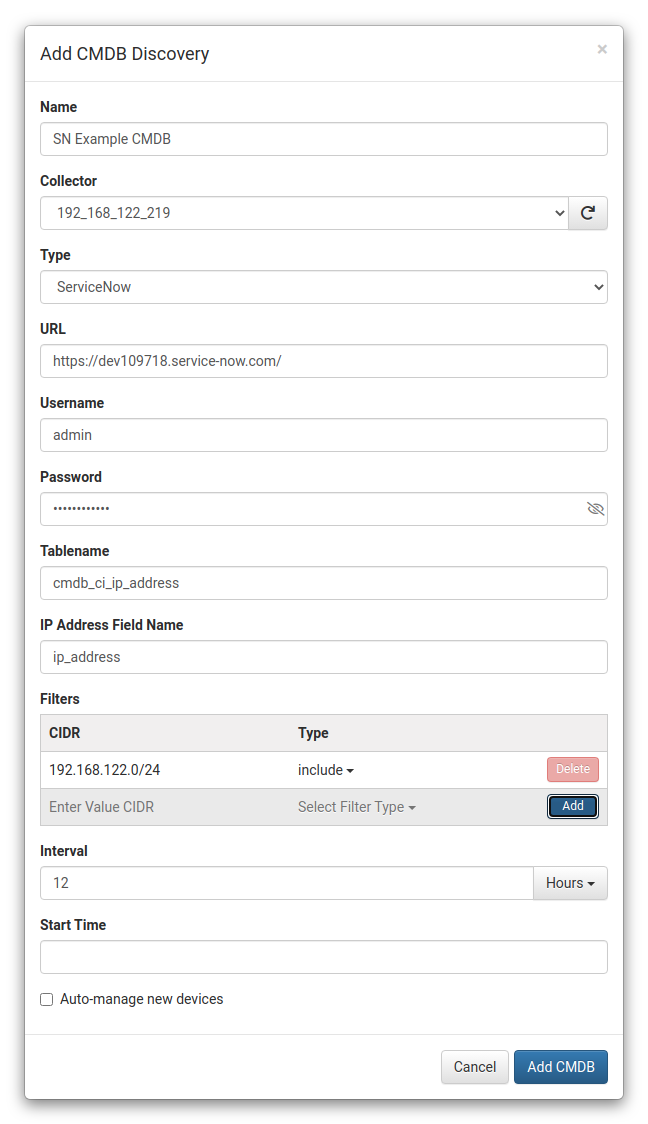
1. Use the *Add* button to create a new CMDB discovery entry.
2. Set an appropriate name
3. Choose a Collector used to communicate with ServiceNow
4. Set the Type to `ServiceNow`
5. Set the URL (URL to the ServiceNow instance)
6. Set the Username and Password to access ServiceNow
7. By default the *Tablename* and *IP Address Field Name* are set to match the defaults for the ServiceNow IP Address table, however they can be modified to extract from any CMDB table (for example `cmdb_ci_netgear` and field `ip_address`)
8. Optionally configure one or more filters to specify network ranges. By default all IPs discovered will be added to SIFF, otherwise if filters are used:
* If only *include* filters: add IPs that match ranges only
* If only *exclude* filters: add IPs except for those in ranges
* If both types: must be in included ranges but not excluded ranges
9. Set *Auto-manage* to true to have SIFF attempt to manage new devices, otherwise by default they are just added to the *Unmanaged* elements. It's recommended to finish configuration and verify the discovery is working as expected before enabling this.
10. Click the *Save CMDB* button
11. Back on the CMDB list select the *Run Discovery* button to force a discovery in order to verify the configuration.
12. When complete switch to the *Elements* -> *Unmanaged* tab to see if the expected IPs have been added.