> For the complete documentation index, see [llms.txt](https://siff.gitbook.io/siff/llms.txt). Markdown versions of documentation pages are available by appending `.md` to page URLs; this page is available as [Markdown](https://siff.gitbook.io/siff/guides/sso-external-authentication/okta.md).
# Okta
**Note:** This guide only covers configuring SIFF to use the *Org Authorization Server* provided by default in Okta. For Okta customers with *API Access Management* it's also possible to use a custom authorizaton server which follows a similar set of configuration except the groups scopes/claims must be explicitly managed.
### Start SIFF Configuration
First begin by editing the organization within SIFF and selecting *Okta* as the provider type. The dialog will update with some additional fields as shown below. For now do not worry about the *Issuer URL*, *Provider ID*, or *Provider Secret*, these will be provided once the Okta configuration is completed.
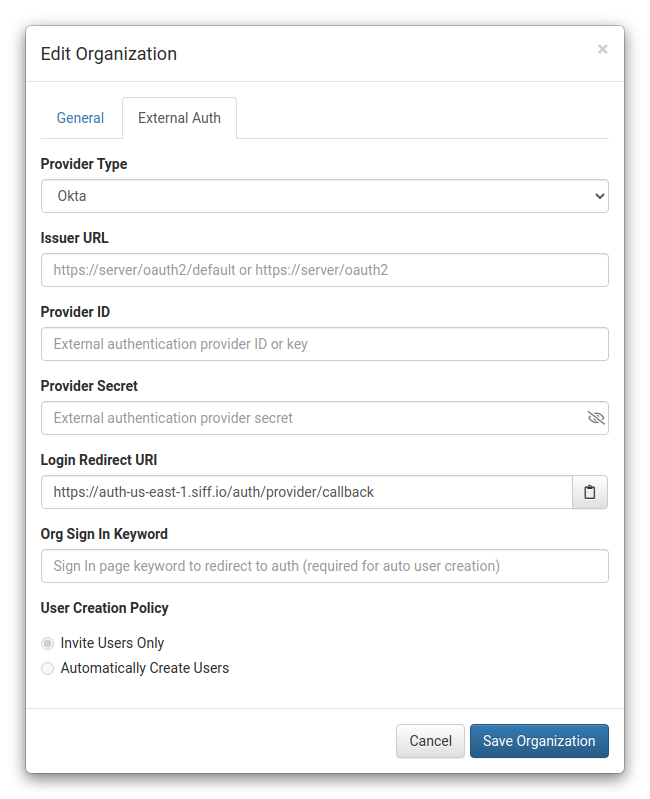
Keep this open for now, continue below with a new browser tab/window.
### Setup Okta
1. Log into the Okta admin console and navigate to *Applications*
2. Use the *Create App Integration* button:
1. Sign-in method: *OIDC - OpenID Connect*
2. Application type: *Web Application*
3. click *Next*
4. App integration name: `SIFF`
5. Logo: leave blank
6. Sign-in redirect URIs: copy the *Login Redirect URI* from the SIFF *Edit Organization* dialog
7. Sign-out redirect URIs: leave blank
8. Trusted Origins: leave blank
9. Assignments: *Skip group assignment for now* (see below)
10. click *Save*
3. After saving you will be redirected to the configuration screen for the new app.
4. Select the *Assignments* tab and assign any users or groups that should have access to SIFF. This step is required however SIFF will also restrict access to only users configured within SIFF - so it's OK to assign the *Everyone* group for convenience.
5. Keep this window open as some details will be needed to complete the SIFF configuration.
### Complete SIFF Configuration
Switch back to the SIFF *Edit Organization* dialog:
1. In Okta switch to the *Sign On* tab and copy the *Issuer* URL into the SIFF *Issuer URL* field. Also add `/oauth2` to the end of the URL. So for example it may look like this: `https://somedomain.okta.com/oauth2`
2. In Okta switch to the *General* tab and copy the *Client ID* into the *Provider ID* field.
3. Copy the *Client Secret* from Okta into the *Provider Secret* field.
4. Optionally set an *Org Sign In Keyword*. This will allow users to enter the keyword versus their username and let the external authentication provider prompt for it or just pass through if already authenticated.
5. *Save Organization* to save and close the dialog.
With the configuration complete refer to the [External Auth - Configuring Users](https://docs.siff.io/guides/external-auth/#configuring-users) section to switch/invite users to use the external authentication provider and test it out. Optionally also set up automatic user creation as outlined below.
### Automatic User Creation
For automatic user creation to work SIFF must be able to determine what Role to assign the user. This is achieved by configuring the SIFF App Integration to include the Groups claim providing SIFF with a list of groups the user belongs to. These groups can then be mapped to SIFF roles.
SIFF will ignore groups that do not have a mapping. Also, SIFF will *only* allow the user to be created if there is at least one mapping.
#### Setup Okta
1. Log into the Okta admin console and navigate to *Applications*
2. Edit the `SIFF` app integration created previous
3. Switch to the *Sign On* tab
4. Edit the *OpenID Connect ID Token* section:
1. Groups claim type: *Filter*
2. Groups claim filter: `groups` *Matches regex*: `.*`\
(alternatively restrict by specifying a regex or other filter type / value - however something must be configured to enable this feature)
3. click *Save*
#### Setup SIFF
On the SIFF side the Organization needs to be updated to make the claim and configure the mapping:
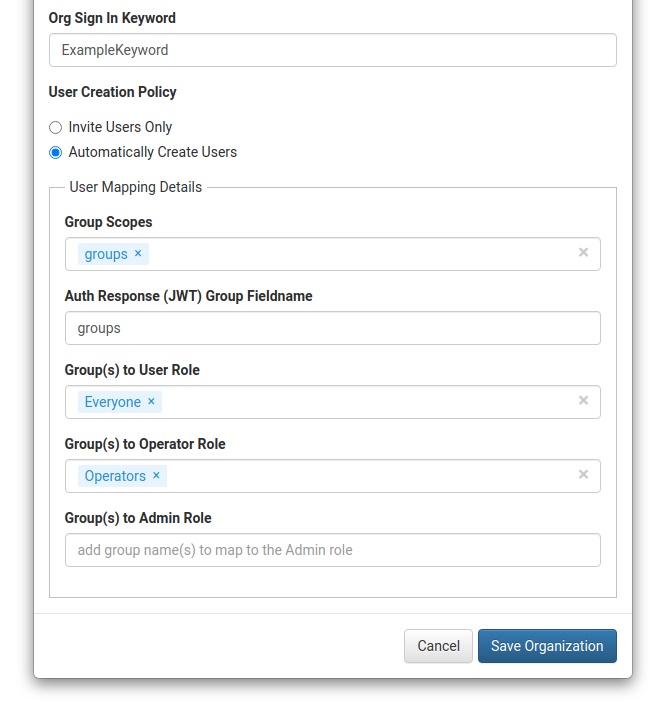
1. In SIFF edit the organization and switch to the *External Auth* tab.
2. Set an *Org Sign In Keyword*. This is required for automatic user creation as SIFF is not aware of the login name (email).
3. Enable *Automatically Create Users*:
1. Group Scopes: `groups` (Okta scope name)
2. Group Fieldname: `groups` (Okta claim name)
3. Group(s) to User/Operator/Role: assign zero or more groups to each Role.
4. click *Save Organization*
That's it - users should now able to use the sign in keyword and then get redirected and logged into SIFF if they have access (Okta assignments) and have at least one role mapped.